Friday, May 3, 2013

Getting error while creating a new web app saying "The password supplied with the domainname\username was not correct. Verify that it was entered correctly and try again"

When you create new web application at that time you enter your credential as the system account of the particular Web Application.

After that when you update your credential at that time you must have to update your credential in SharePoint also because SharePoint store your credential in SharePoint database.

To update your credential in SharePoint Database you must have to pass follow command in command prompt:

** Please open command prompt in Administrator mode.

  1. cd "C:\Program Files\Common Files\Microsoft Shared\Web Server Extensions\14\BIN" and press enter.

  2. stsadm -o updatefarmcredentials -userlogin <domain\username> -password <newpassword>


Once you update your credential in SharePoint database it will not effected directly so that you need to restart you IIS Web Server. For that following command will be fire in command prompt.

  1. iisreset /stop

  2. iisreset /start

Wednesday, May 1, 2013

Make Windows 8 Boot Directly To Desktop

Would you prefer to have Windows 8 bypass the Start Screen and boot straight to the desktop? If so, you can do so using a technique that takes advantage of a feature that is built right into the operating system - no third-party tools required. All you have to do is create a specially configured task that is scheduled to run at log on.

In this post, I’ll walk you through the steps required to make Windows 8 boot straight to the desktop using a specially configured scheduled task.

As you may recall, in previous versions of Windows, a special shortcut called Show Desktop appeared on the Quick Launch menu. This shortcut was a standard text file that contained five lines of code and was saved with the file extension SCF. The fifth line of that code wasCommand=ToggleDesktop.

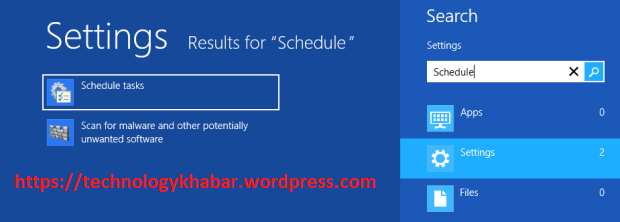
To begin you’ll need to launch the Task Scheduler tool. To do so, just press the [Windows] key, type Schedule, select Settings, and click Schedule tasks, as illustrated in Figure A. When you do, the Task Scheduler will appear.

[caption id="attachment_3" align="alignnone" width="594"]Task Scheduler Task Scheduler[/caption]

Configuring Task

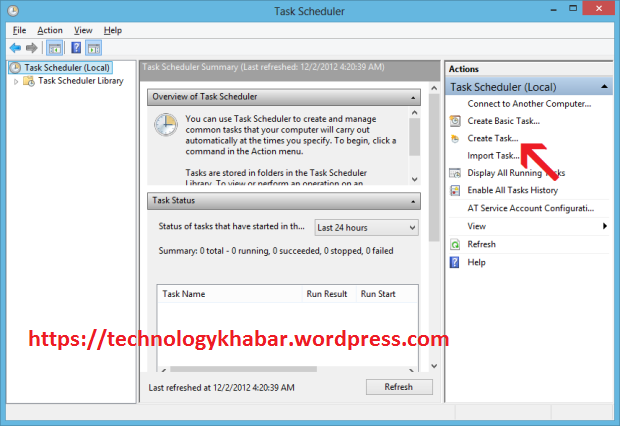
Once you have the Task Scheduler up and running, you’ll begin by clicking the Create Task command in the Actions panel, as shown in Figure B.

[caption id="attachment_4" align="aligncenter" width="594"]Create Task Command Create Task Command[/caption]

When the Create Task dialog box appears, you’ll see that the General tab is selected and will first assign the task a name in the Name text box. As you can see, I choose Show Desktop @ Start. Then, towards the bottom of the page, select Windows 8 from the Configure for drop down menu, as shown in Figure C. You can leave the Security options set to Run only when user is logged on.

[caption id="attachment_5" align="aligncenter" width="594"]Creating a Task Creating a Task[/caption]

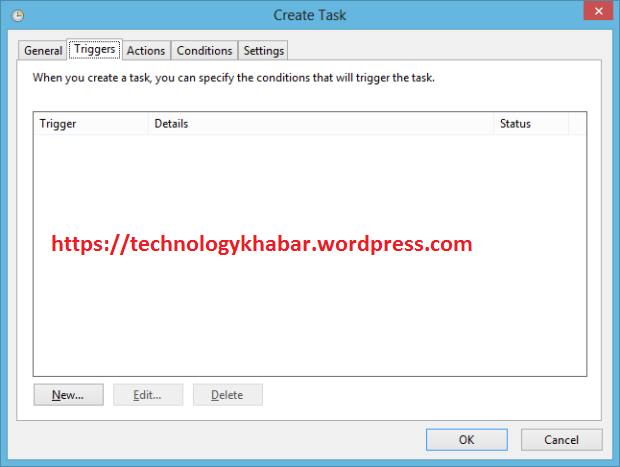
To continue, select the Triggers tab to access that page, as shown in Figure D. Now, click the New button towards the bottom of the page.

[caption id="attachment_6" align="aligncenter" width="594"]Trigger Command Page Trigger Command Page[/caption]

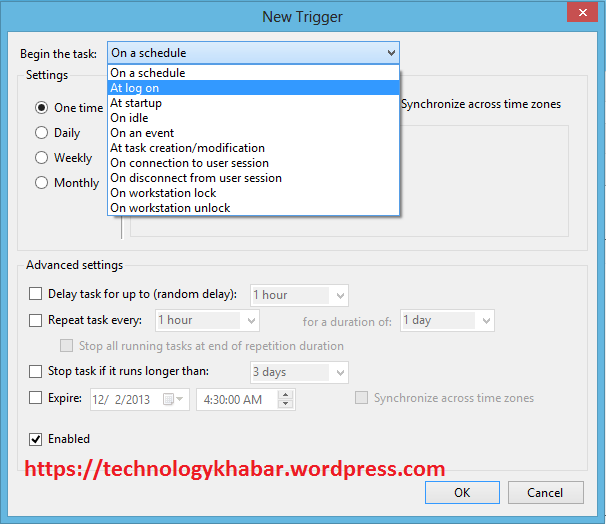
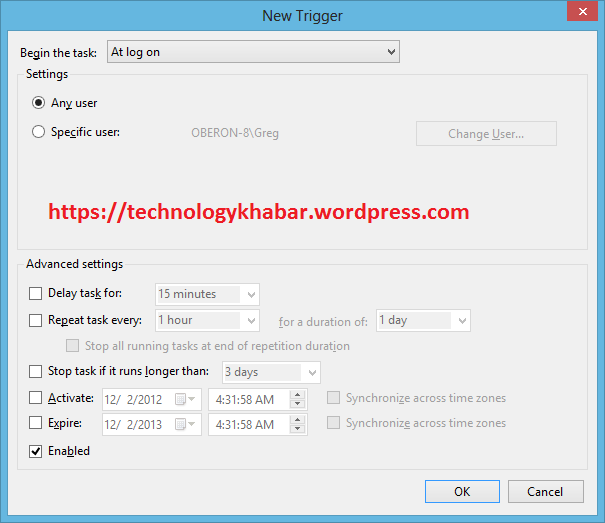
When you see the New Trigger dialog box, select the At log on item from the Begin the task drop down menu, as shown in Figure E. As soon as you do, the New Trigger page will refresh and display the settings for the At log on option, as shown in Figure F.

[caption id="attachment_7" align="aligncenter" width="594"]When Command Triggered Selection When Command Triggered Selection[/caption]

[caption id="attachment_8" align="aligncenter" width="594"]Command Triggered when User Log On Command Triggered when User Log On[/caption]

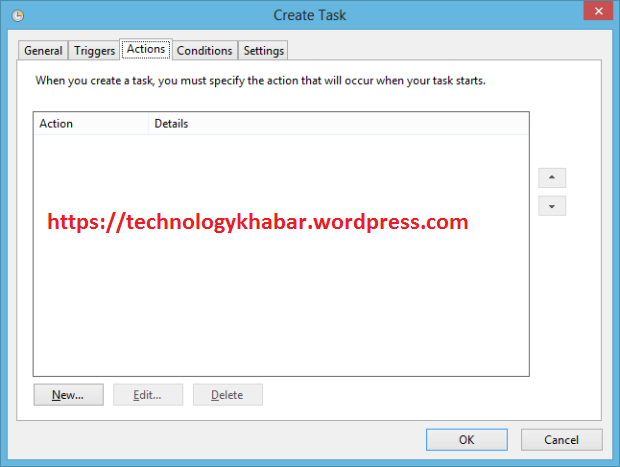
By default, the Any user option in the Settings panel and the Enabled check box in the Advanced Settings are selected. Just leave them as they are and click OK to continue. When you return to the Create Task dialog box, select the Actions tab, as shown in Figure G. Then, click the New button towards the bottom of the page.

[caption id="attachment_9" align="aligncenter" width="594"]Command Action Command Action[/caption]

When you see the New Action dialog box, you’ll find that the Action setting is by default set to Start a Program. So, in the Settings panel, you can just type c:\Windows\explorer.exe in the Program/script text box, as shown in Figure H. You can also use the Browse button to locate and select the explorer.exe program. At this point, just click OK to return to the Create Task dialog box.

[caption id="attachment_10" align="aligncenter" width="468"]Specify Action Path Specify Action Path[/caption]

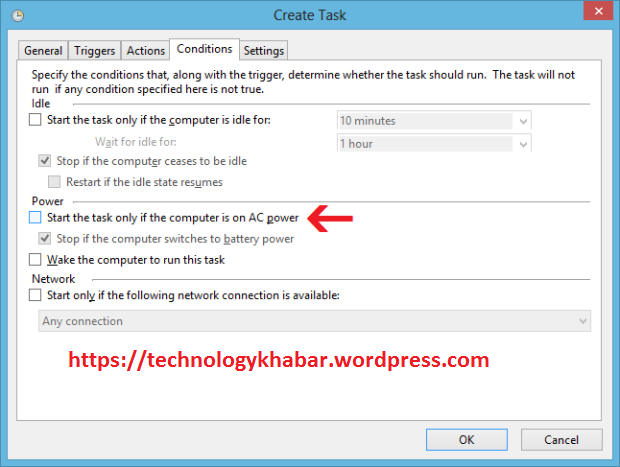
Now, IF you are running Windows 8 on a laptop, select the Conditions tab and in the Power panel, clear the Start the task on if the computer is on AC power check box, as shown in Figure I.

[caption id="attachment_11" align="aligncenter" width="594"]Creating a Task Creating a Task[/caption]

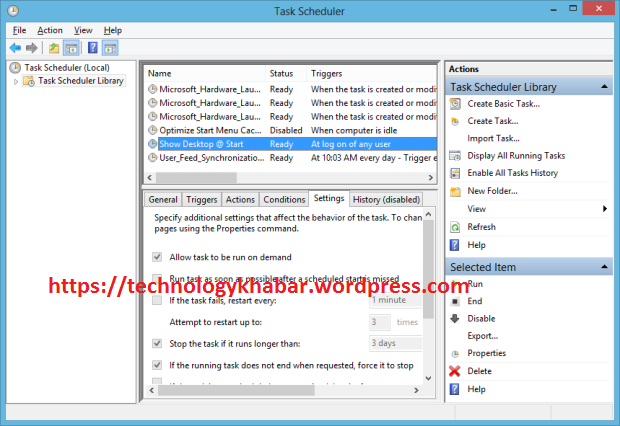
There is nothing that you need to change on the Settings tab so, at this point, you are done and can just click the OK button to complete the scheduled task operation. When you return to the Task Scheduler window, you’ll see the new task that you just created on the Task Scheduler Library, as shown in Figure J. You can now close Task Scheduler.

[caption id="attachment_12" align="aligncenter" width="594"]Schedule a Task Schedule a Task[/caption]

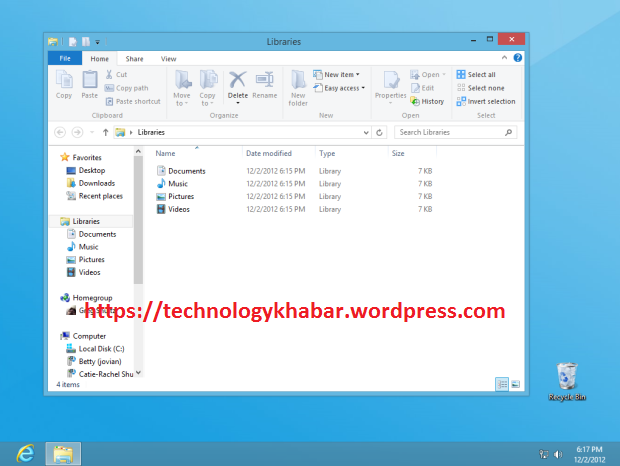
Your task is done now. When Windows 8 restarts, you’ll immediately see the Desktop with a File Explorer window targeted on Libraries, as shown in Figure M. You will not see the Start Screen at all.

(Keep in mind that when you see the File Explorer window targeted on Libraries, the Documents Music, Pictures, and Video icons may shuffle around a bit. The reason for this is because when the File Explorer window appears on the screen, the operating system is still doing a bit of housework in the background.)

[caption id="attachment_13" align="aligncenter" width="594"]Windows 8 Desktop Windows 8 Desktop[/caption]
Wednesday, April 24, 2013

First 9 things required to set as default setting in MS Word 2013

Everyone wants to work with latest software and make themselves upgraded with latest functionality. MS Office came up with 2013 version and it requires some default setting to make your document unchanged in other office version.

Now, the changes I make may not make sense for you and I am not suggesting that everyone do exactly what I do, but I am suggesting that you take a few minutes to adjust the default settings in MS Word 2013 to make it work the way you want it to work - at least as best you can. And, I mean before you starting using it, not after. A few minutes now can save you some frustration later.

Change the Normal Template

This suggestion is probably the most obvious and the most often overlooked. I don’t like the default font and spacing in Word. Personally I like the Arial font instead of Calibari and I like my paragraphs spaced evenly, so I change the default Normal Template (Figure A) right away.

Fig. A - The default Normal Template


Right-click the Normal Style in the Ribbon to get to the Modify Style options screen shown in Figure B. I change the font to Arial 10.

Fig. B - Change the Font


Fig. C - Change the Spacing


Click OK a few times to put the modifications into action. Remember to click the New documents based on this template radio button to make this your permanent Normal Template.


Word Options

This next set of modifications is very subjective - I make them because it makes my life as an editor easier. Reviewing the options may give you some ideas that will increase your productivity.

Formatting Marks

As an editor, I need to see every character on the page, even if the character is a blank space, so I always turn on all formatting marks. Click File in the menu bar and navigate down to the Options link to reach the Word Options configuration screen (Figure D). Click on the Display tab to reach the formatting marks settings. Click the Show all formatting marks check box.

Fig. D - Formatting Marks

Turn off Smart Quotes

Smart Quotes look great when you are in Word, but they don’t play well with WordPress and the other tools I have to use to publish content on TechRepublic, so I always turn them off. This is a two-step process, which makes it slightly tricky.

Under the Proofing tab you will see a button with the label: Auto Correct Options. When you click that button you are taken to the Auto Correct configuration screen. Click the Auto Format tab (Figure E) and deselect the Replace Straight quotes with smart quotes check box. For good measure, I also unchecked the boxes for Ordinals, Fractions, and Hyphens.

Fig. E - No Smart Quotes for me


Here is the slightly tricky part, you also have to look under the Auto Format As You Type tab and unchecked the appropriate check boxes under the Replace as you type category (Figure F). Click OK to apply the changes.

Fig. F - Also under replace as your type


Advanced Changes

One of the features Word employs to purportedly make our lives easier is called “smart” selecting. I hate it. I much prefer to select what I want to select without Word presuming I want a whole word or sentence or paragraph. Perhaps you like this feature, but it is not for me.

Under the Advanced tab of Word Options (Figure G), you will see several check boxes regarding selecting. I turn off selecting the entire word, and smart paragraph selection. I also typically click the check box that turns on Use Normal style for bullet-ed or numbered lists.

Fig. G - I prefer manual selection


This next change is really just for editing purposes, so it may not apply to you, but it is still good to know where the feature is located in case you ever need it. Further down the page under the Advanced tab there is an item that says: Style area pane width in Draft and Outline views (Figure H). I change that from zero to one inch. That change will reveal the style name used for each section of your document. Click OK to apply all of your changes.

Fig. H - Reveal your style

Quick Access Toolbar

As part of the ribbon interface, in the upper left corner, Word has a feature called the Quick Access Toolbar. However, the default configuration for that feature is, to put it politely, sparse: Save, Undo, and Redo.

While there are many tools and features to choose from when adding to the Quick Access Toolbar
(Figure I), I start with four obvious ones. No doubt, I will add more, as I am sure you will too.
  • Quick Print
  • Print Preview
  • Spelling & Grammar Check
  • Draft Mode
  • Save

Fig. I - Expand Selections on the quick access toolbar


Adding Quick Print, Print Preview and Spelling and Grammar is very simple: click the down arrow on the Quick Access Toolbar to reveal a list of potential tools and click the appropriate entries on the list.

Adding Draft mode is a little more complicated. There are several ways to accomplish the task, but the easiest way is to click the View tab (Figure J) and then right-click the Draft icon and select the Add to Quick Access Toolbar item.

Fig. J - Add Draft Mode

Set Zoom

The last thing I do depends on the display screen I am working on at the time. For large monitors, I change the Zoom factor to a higher percentage. The Zoom slider is located in the bottom right corner of you Word window. The default is 100%, but for 24 inch screens I typically bump this percentage to 180%. Click the 100% in that bottom right corner to get the Zoom configuration screen (Figure K) and change the percentage to 180. Or if you are good with the slider you can simply move it to your desired percentage.

Fig. k - Zoom to 180%

Bottom Line

None of the changes I have outlined are absolutely necessary, but for me, making these adjustments saves time, frustration, and headaches. The changes you make may not be the same as mine, but I am willing to bet, whatever changes to defaults you do make, are also made with the desire to save you time, frustration, and headaches.

Sunday, October 28, 2012

How to allow user to Run only specific Application in Windows 7

If you are a System Administrator of a Company and as your Company standard user can run only specified Application which is authorized, then your task is How to allow user to run Only Specified Application such as MS word , Internet Explorer , MS Excel and Notepad etc.

Please follow the following step to do this :


  • Open Group Policy Editor by typing "gpedit" in start menu's search bar as same as displaying in following image.
  • Following screen is appeared.

  • In the above screen select the option in following way..
    • Select User Configuration
    • Select Administrative Templates
    • Select System 
  • In System option select "Run only specified Windows Application" as shown in following screen.

  • Now in opened screen select "Enabled" Radio buttion and click on "Show" button as displaying in following image.


  • Now new screen is displayed in that write the list of application's .exe file that you want to access to the user.

  • Some list of exe file name associated with application is as follow :
    • MS Word                 -      winword.exe
    • MS Excel                 -      excel.exe
    • Notepad                  -      notepad.exe
    • Internet Explorer   -      iexplore.exe
    • Calculator               -       calc.exe
    • Visual Studio         -       devenv.exe
  • After specify the list of exe file in the above screen click on OK button and then Apply button and then OK button.
  • Now, If user is going to access other than specified application it will give error message as following.

Wednesday, October 3, 2012

Android Code for calling .NET web service

You need to declare 4 variable to call web service method
  • OPERATION_NAME - name of method to call
  • NAMESPACE - namespace
  • SOAP_ACTION - particular methdo of specified namespace
  • URL - URL of your web serivce

Declare above variable as below :
  • String OPERATION_NAME="HelloWorld";
  • String NAMESPACE="www.tempuri.org/";
  • String SOAP_ACTION=NAMESPACE+OPERATION_NAME;
  • String URL="http://your-ip-address/your-application-nm(in .net)/Service.asmx"; ***

Note ***:  in above statement instead your-ip-address you have to write your own local pc ip address. you can find it from command prompt to invoke the ipconfig command. and specify your-application-nm which you specify at the time of making .NET web service.

Code to call HellowWorld method. (Default Method)

try{
   
      SoapObject request = new SoapObject(NAMESPACE,OPERATION_NAME);

      //below statement passes argument to the web method specify in web service.
      request.addProperty("name", "How r u?");   **

      SoapSerializationEnvelope envelope = new SoapSerializationEnvelope(SoapEnvelope.VER11);
      envelope.dotNet=true;
      envelope.setOutputSoapObject(request);
      HttpTransportSE androidHttpTransport = new HttpTransportSE(URL);
      androidHttpTransport.call(SOAP_ACTION, envelope);
      Object result = (Object)envelope.getResponse();
      status=result.toString();
      Toast.makeText(getBaseContext(),status,Toast.LENGTH-LONG).show();
}
catch(Exception e)
{
      Toast.makeText(getBaseContext(), e.toString(), Toast.LENGTH_LONG).show();
}

NOTE ** : in this statement as first argument is as same as the name of the method argument you specified in .net and second argument the value of the argument.


Output :  HelloWorld How r u?
Explanation : HelloWorld from the method itself and second word which we pass from the ** statement.

Tutorial of Android Web Service Application with VB .Net

Hello Friends,

Today I am going to discuss with you that how to make web service in .NET and how to call it from android.

You need following tools to develop application.
  • Microsoft Visual Studio 2008 (to develop web methods)
  • Internet Infomation Service (IIS 6 for Windows XP and IIS 7.5 for Win7) (virtual server)
  • Android SDK (Min API Level-7) (to call web methods)
  • Eclipse HELIOS
  • KSOAP-android-2.5.2 jar file (it's a java class file which your have to include in your code.

Step 1 : You need  Microsoft Visual Studio 2008 to develop web-service method. You can download it from here.

Step 2: You can download IIS 7.5 from here.

Step 3: You can download android SDK from here.

Step 4: You can download Eclipse HELIOS from here.

Step 5: You can download KSOAP 2.5.2 jar file from this link

You have to explicitly add external libraries in your project by following step :

Right click on your project and select properties and click on Java Build Path -> Libries(Tab) -> Add External JARs.. (Button) and specify you KSOAP 2.5.2 file path.

Note : You need Dot Net Framework 3.5 to run IIServer on your local computer. You can externally download and install it from here.

Install all above softwares on your local computer and integrate your eclipse with android SDK.

You can show step to create web method from this link.

Step to call web service from android is mentioned in this link.

Monday, October 1, 2012

How to Create Web Service in Microsoft Visual Studio 2008 in Windows7

Here I am going to explain you how to develop web service in Microsoft Visual Studio 2008.

You need Internet Infomation Server (IIS) 7.5 as virtual server to run the web service.

You can download IIS 7.5 from here.
You need Dot Net Framework 3.5 to install IIS 7.5 You can download it from this link.

Now to configure IIS you have to go in control panel - > Programs and Features -> Turn Windows Features on or off.

Click on  Turn Windows Features on or off.

Now check 2 check box listed below :

  • Internet Information Service
  • Internet Information Service Hostable Web Core
Now Click on OK button and Restart your computer.

Now, You can check whether your web server works properly or not by following step :
  • Open your web browser and type localhost
  • If it successfully show you IIS 7 page then your web service will work properly otherwise something goes wrong.
Now Time to implement web method. To develop web method you need to open Microsoft Visual Studio 2008 in Administrative mode. You can right click on Microsoft Visual Studio 2008 and click on Run as Administrator. It will open IDE of Microsoft Visual Studio in Administrator mode.

Now to develop new web-service follow the following steps :

  1. You have to create new project so that go to File Menu -> New -> Website
  2. Select ASP.NET Web Service in Template.
  3. Now following window will be appear.

    3.  Now select HTTP in Location Option form Drop Down box because our method is resides on server and provide name of your web-service in following format : http://localhost/your-application-name.
    4.  Now select Visual Basic in Language Option because here I am going to explain code in VB,
    5.  Now click on Ok button.
    6.  By Default one method named HelloWorld will be created and it will return HelloWorld while one can invoke it.
    7. Define your own method and specify your logic.
    8. Do not forget write <WebMethod()> _  at every beginning of  method because it defines that this method is web method and called by application. If your not specify <WebMethod()> _  then that method will be used as private/local method.
    9. Now your web method will be define successfully.

You can manually run your web service from browser by written as follow :

http://localhost/your-application-name/Service.asmx


Android Code for calling web service method click on this link

Tuesday, September 25, 2012

How to Fix Write Protected Error...

What is Write Protected error and why it happens?

In the Write Protected error, we can not write or copy any data in to flash/USB drives and even can not format it.
There are many reasons that causes this problem. Here I give share the solution to fix that problem.

Solutions: 

  • Just download this helpful software from here and run it to execute a “low-level format” on the drive. This software is quite handy and may take few attempts to actually remove the error.
  • If that low level format tool does not work, try another one Link.
  • The problem can also be caused by some virus activity so just get it scanned by some updated good anti virus which may solve your problem.
  • BUT if none of the methods listed above solves your problem then your pen drive might have gone corrupted, so just get it replaced.
  • After the low level format, you may need to “Partition the drive“. Dont worry, partitioning a pen drive means allocating it its File System and Cluster Size that was lost after the Low Level Format.

Solution 1 :

  • Run diskmgmt.msc in Run.
  • In the disk management window, select the pen drive, right click on it and click on Format.

Solution 2:

  • Follow the steps in this post and just put the value 0 (zero) in step 5.

Hope any of the methods listed above solves your problem.

How to make your USB as Write Protected

Today when I got some data transferred in my friends pen drive at my rum that made me think that I need to remove Write Protect his pen drive. The drive has about 7 different types of viruses in Pen Drive. It is so irritating to always scan the drive to remove the viruses that also consumes our important time. So I got something to share with you guys “How you can Write Protect your Pen Drive” or “How you can prevent your pen drive from getting infected”.

Things to note before doing this :

  • As the trick will write protect your pen drive, you will not be able to transfer anymore data until you disable it again (works best if you only wish to copy or read something from the drive).
  • If you are not good at editing registry then backup yours registry file.
  • You need Admin rights to work upon the Registry Editor.

Steps to make your drive Write Protected :

  1. Open Registry Editor by typing regedit in Run dialog.
  2. Navigate to the key HKEY_LOCAL_MACHINE\SYSTEM\CurrentControlSet\Control\
  3. Find a sub key inside it named “StorageDevicePolicies”. If it does not exist there then we need to make it. Right click on “Control” key -> New -> Key. same it “StorageDevicePolicies” without quotes.
  4. Now right click on this newly created key and then click New -> DWORD value and name it as “WriteProtect”.
    5.  Modify this key and give its value as 1.

     6. Click on OK and restart your computer.

Now no more data can be transferred to the drive but to start using the drive again just give the "WriteProtect" key a value of 0 instead of 1 and don't forget to restart the PC.

Tuesday, August 7, 2012

How to do ODBC Connection with C++ code

ODBC DSN Step with C++
 
 ODBC (Open Database Connectivity)

• A standard interface for connecting from C++ to relational databases
• It allows individual providers to implement and extend the standard with their own ODBC drivers

Here are procedures or rather steps used in the industry in C++ coding for connecting to a database

Steps of the ODBC

• Include Header Files
• Open a Connection to a Database
• Choose an ODBC Driver
• Query the Database
• Creating an ODBC Statement Object
• Executing a Query and Returning an ODBCResultSet Object
• Extracting Data from an ODBCResultSet
• Closing the ODBCResultSet and ODBCStatement
• Importance of closing the connection

Ok, this are actual steps how I connect to a database…definitely I used Oracle database, but I don’t want to further say what version it is.

1. Include the Header Files
# include statements at the beginning of your programs:
#include <sql.h>
#include<sqltypes.h>
#include<sqlext.h>

2. Open a Connection to a Database 

Set the environment handle:
SQLAllocHandle(SQL_HANDLE_ENV,
SQL_NULL_HANDLE, &hdlEnv);

Set ODBC Driver version:
SQLSetEnvAttr(hdlEnv,SQL_ATTR_ODBC_VERSION, (void*)SQL_OV_ODBC30);

Set the connection handle:
SQLAllocHandle(SQL_HANDLE_DBC,
hdlEnv, &hdlConn);

Connect to the database:
SQLConnect(hdlConn, (SQLCHAR*)dsnName,SQL_NTS,(SQL CHAR*) userID,SQL_NTS, (SQLCHAR*)passwd, SQL_NTS);

3. Choose Driver
•DSN – Data Source Name
•Open the GUI ODBC Administrator (ODBCConfig)
•Choose the appropriate ODBC driver
•Provide a meaningful name to the DSN
•Specify the server and the host string (host string is required if the server is running on a different machine)

4. Query the Database
Querying the database involves the following steps:

–Creating a Statement
SQLAllocHandle(SQL_HANDLE_STMT
, hdlDbc, &hdlStmt);
It allocates the memory for the statement handle. The database handle obtained during connection phase is passed as the second argument.

– Executing a Query
SQLExecDirect(hdlStmt, stmt, SQL_NTS);
It executes the query, which is passed in as SQLCHAR* in the second argument.

5. Extract the Data out of the Executed Query

SQLGetData(hStmt,colNum,type,retVal,buffLength,&cbData);
It extracts data from table as void* data and places it in retVal

colNum refers to the column number provided in the SELECT statement in SQLExecDirect()

Type is one of the standard ODBC data types
example: DT_STRING à for a string data type
DT_DOUBLE à for a double data type

buffLength is the estimated size of the expected data

cbData is the actual size of the data

6. Traverse Through the Results
SQLFetch(hStmt);
Fetches the next record

hStmt is the statement handle obtained using SQLAllocHandle
If a record is available, It returns SQL_SUCCEEDED

7. Close the Statement and the Connection
SQLFreeHandle(SQL_HANDLE_STMT,hdlStmt);
It closes and de-allocates the memory reserved for the statement handle

SQLFreeHandle(SQL_HANDLE_DBC, hdlConn);
It disconnects and de-allocates the memory reserved for the connection handle

SQLFreeHandle(SQL_HANDLE_ENV, hdlEnv);
It de-allocates the memory occupied by the environment handle